基于W803开发板SDKV2.X开发的天气盒子
- 准备工作
下载WM IOT SDK2.X,按照官方的SDK文档配置好开发环境,本项目是基于VS CODE环境的开发,大家可以参考官方的SDK关于VS CODE环境搭建部分。如下链接
https://doc.winnermicro.net/w800/zh_CN/latest/get_started/ide.html
- 效果展示

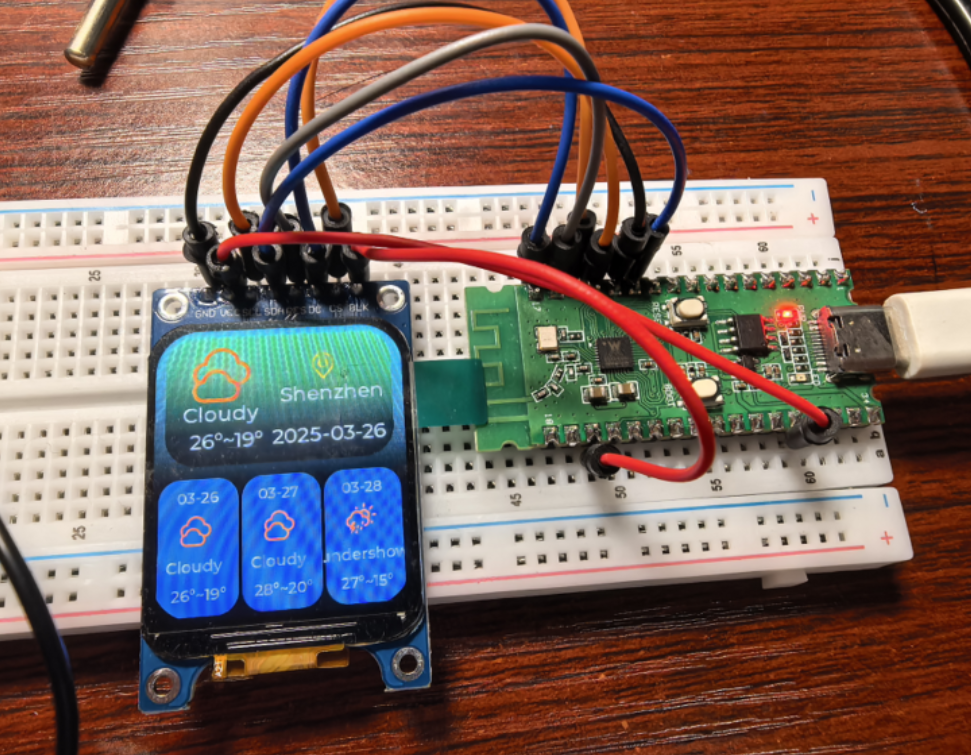
- 代码仓库地址
如下链接是本项目的开源地址,欢迎大家指正,此仓库包含了SDK和应用程序两部分
https://gitee.com/Bryan_He/w803_lcd_demo.git
代码结构目录: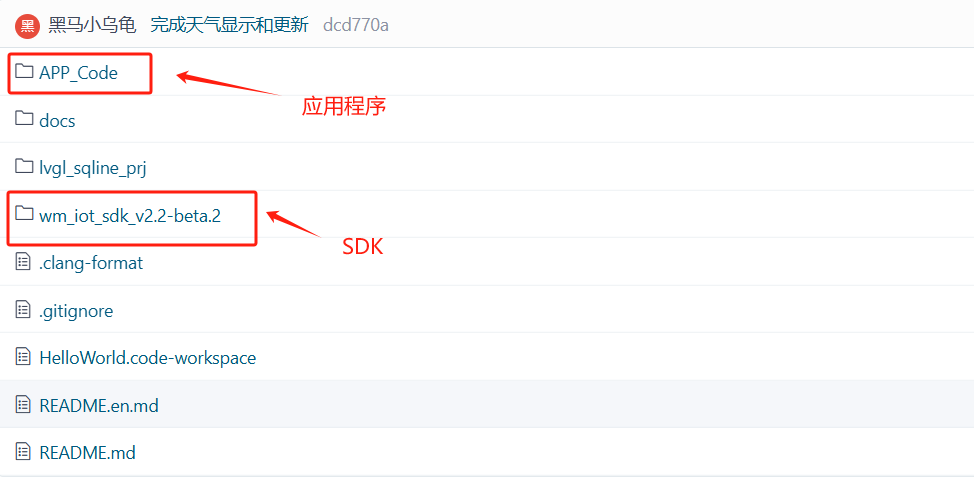
- 硬件接线图
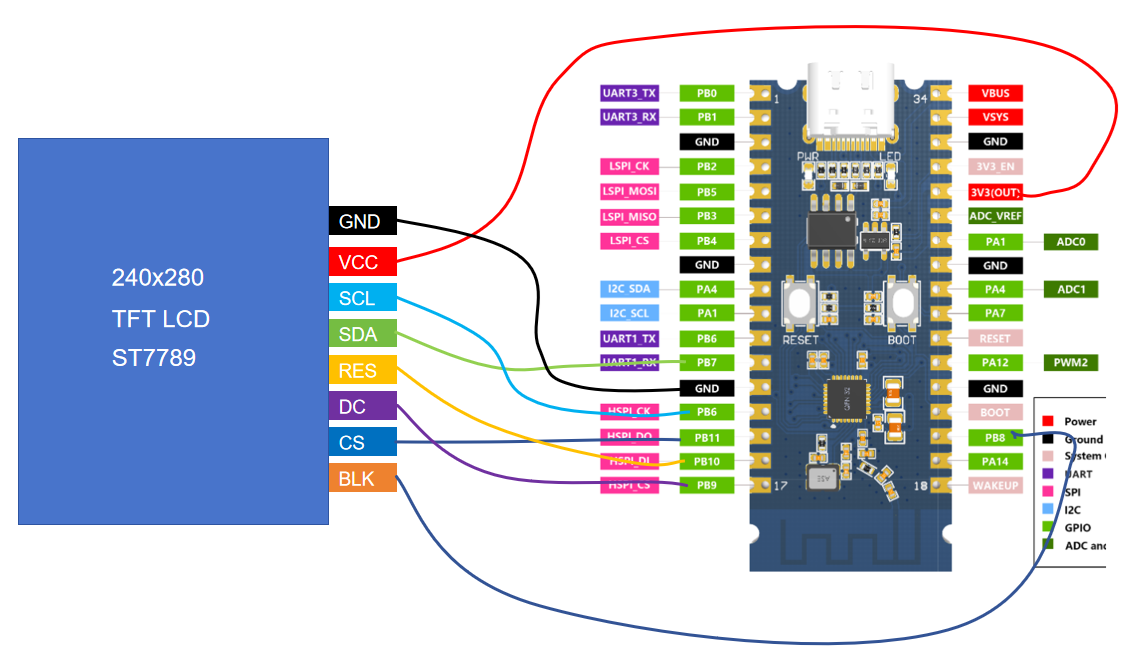
- menuconfig的配置文件
拉取工程项目代码后,按官方的SDK描述文档,使用VS code打开导入项目,另外需要导入menuconfig文件,如下是我配置工程后导出的配置文件,可在menuconfig界面导入这个配置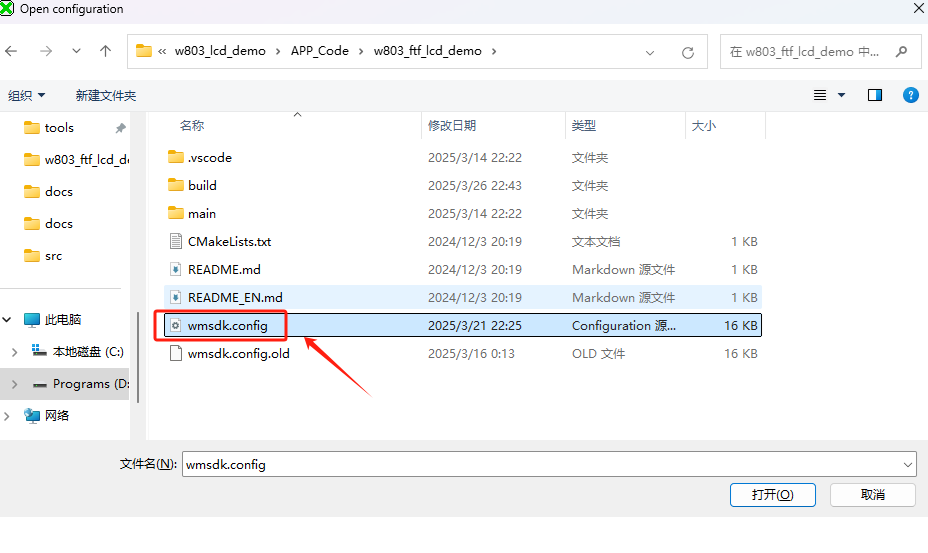
- HTTP天气应用开发过程中的注意事项
本项目访问的是心知天气的服务器,服务器端使用的是HTTPS协议,在menuconfig中需把HTTPS相关的配置勾选上,不然访问服务器会报错。
如下是报错信息
解决办法如下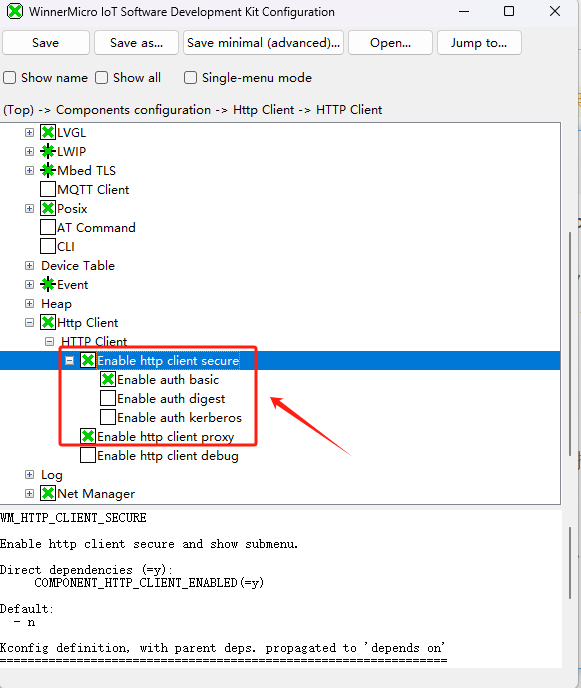
- 由于心知天气的服务器返回的天气信息是以json格式返回的,我们需要用到Cjson库,所以在menuconfin中还需配置包含cjson部分,如下是配置和部分cjson解析代码
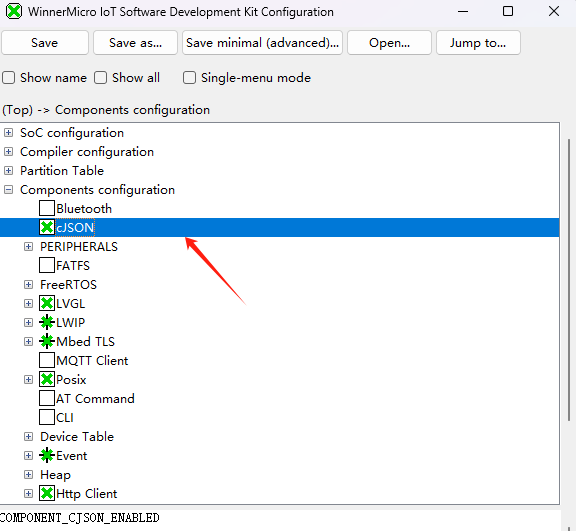
天气解析部分代码
int wm_weather_httpc_get(void)
{
    wm_http_client_config_t cfg = { 0 };

    cfg.method        = WM_HTTP_CLIENT_REQUEST_TYPE_GET;
    cfg.keep_alive    = 1;
    cfg.content_type  = WM_HTTP_CLIENT_CONTENT_APPLICATION_JSON;
    cfg.event_handler = wm_httpc_event_handle;

    return wm_httpc_example_send_req(&cfg, "https://api.seniverse.com/v3/weather/daily.json?key=SUCC86skWZuKkdxCM&location=ip&language=zh-Hans&unit=c&start=0&days=3", NULL, 0);

}

extern uint8_t weather_active;
static int cjson_extract_weathe_datas(char *value) {
int i=0;
// 解析JSON
cJSON *root = cJSON_Parse(value);
if (!root) {
    printf("JSON parse error: %s\n", cJSON_GetErrorPtr());
    return 1;
}

// 获取results数组
cJSON *results = cJSON_GetObjectItemCaseSensitive(root, "results");
if (!cJSON_IsArray(results)) {
    printf("Results is not an array\n");
    cJSON_Delete(root);
    return 1;
}

// 遍历results数组
cJSON *result_item;
cJSON_ArrayForEach(result_item, results) {
    // 解析location信息
    cJSON *location = cJSON_GetObjectItemCaseSensitive(result_item, "location");
    if (location) {
        // printf("城市信息:\n");
        sprintf(xinzhiWifor.location_id,"%s",cJSON_GetStringValue(cJSON_GetObjectItem(location, "id")));

        // printf("ID: %s\n", xinzhiWifor.location_id);
        // printf("名称: %s\n", cJSON_GetStringValue(cJSON_GetObjectItem(location, "name")));
        // printf("国家: %s\n", cJSON_GetStringValue(cJSON_GetObjectItem(location, "country")));
    }

    // 解析daily天气预报数组
    cJSON *daily = cJSON_GetObjectItemCaseSensitive(result_item, "daily");
    if (cJSON_IsArray(daily)) {
        // printf("\n天气预报:\n");
        cJSON *daily_item;
        char *end;
        uint8_t day_code,night_code;
        uint8_t tl,th;


        cJSON_ArrayForEach(daily_item, daily) {

            day_code = strtol(cJSON_GetStringValue(cJSON_GetObjectItem(daily_item, "code_day")),&end,10);
            night_code = strtol(cJSON_GetStringValue(cJSON_GetObjectItem(daily_item, "code_night")),&end,10);
            tl = strtol(cJSON_GetStringValue(cJSON_GetObjectItem(daily_item, "low")),&end,10);
            th = strtol(cJSON_GetStringValue(cJSON_GetObjectItem(daily_item, "high")),&end,10);
            sprintf(xinzhiWifor.weather_obj[i].date,"%s",cJSON_GetStringValue(cJSON_GetObjectItem(daily_item, "date")));
            // printf("code_day: %d\n", day_code);
            // printf("日期: %s\n", xinzhiWifor.weather_obj[i].date);
            // printf("白天: %s\n", cJSON_GetStringValue(cJSON_GetObjectItem(daily_item, "text_day")));
            // printf("温度: %d℃ ~ %d℃\n",tl,th);
            // printf("风速: %s级 (%sm/s)\n",
            //        cJSON_GetStringValue(cJSON_GetObjectItem(daily_item, "wind_scale")),
            //        cJSON_GetStringValue(cJSON_GetObjectItem(daily_item, "wind_speed")));
            // printf("------------------------\n");
            xinzhiWifor.weather_obj[i].code_day = day_code;
            xinzhiWifor.weather_obj[i].code_night = night_code;
            xinzhiWifor.weather_obj[i].temp_h = th;
            xinzhiWifor.weather_obj[i].temp_l = tl;
            i++;
            weather_active=1;
            if(i>=MAX_WEATHER_DAYS)break;
        }
    }

    // 解析最后更新时间
    cJSON *last_update = cJSON_GetObjectItemCaseSensitive(result_item, "last_update");
    if (cJSON_IsString(last_update)) {
        printf("\n最后更新时间: %s\n", last_update->valuestring);
    }
}

static void wm_httpc_event_handle(wm_http_client_t session, wm_http_client_event_t event, wm_http_client_event_param_t *param,
                                  void *priv)
{
    switch (event) {
        case WM_HTTP_CLIENT_EVENT_CONNECTED:
            wm_log_info("WM_HTTP_CLIENT_EVENT_CONNECTED");
            break;
        case WM_HTTP_CLIENT_EVENT_DISCONNECTED:
            wm_log_info("WM_HTTP_CLIENT_EVENT_DISCONNECTED");
            break;
        case WM_HTTP_CLIENT_EVENT_HEADER_SENTED:
            wm_log_info("WM_HTTP_CLIENT_EVENT_HEADER_SENTED");
            wm_log_info("%s", (char *)(param->data));
            break;
        case WM_HTTP_CLIENT_EVENT_RECV_HEADER:
            wm_log_info("WM_HTTP_CLIENT_EVENT_RECV_HEADER");
            wm_log_info("%s", (char *)(param->data));
            break;
        case WM_HTTP_CLIENT_EVENT_RECV_DATA:
            wm_log_info("WM_HTTP_CLIENT_EVENT_RECV_DATA");
            wm_log_info("%s", (char *)(param->data));
            cjson_extract_weathe_datas((char *)(param->data));
            break;
        case WM_HTTP_CLIENT_EVENT_FINISH:
            wm_log_info("WM_HTTP_CLIENT_EVENT_FINISH");
            break;
    }
    return;
}
- 加入TFT驱动的注意事项
除了按官方的TFT驱动文档外,还需修改这个文件中的内容wmdt.py,不然驱动无法正常加载,如下链接是我驱动移植过程中遇到的问题点
官方文档:https://doc.winnermicro.net/w800/zh_CN/latest/component_guides/driver/drv_tft_lcd.html
问题点链接:http://ask.winnermicro.com/question/1850.html
本驱动还需在LVGL的配置项中按如下配置勾选,不然颜色不对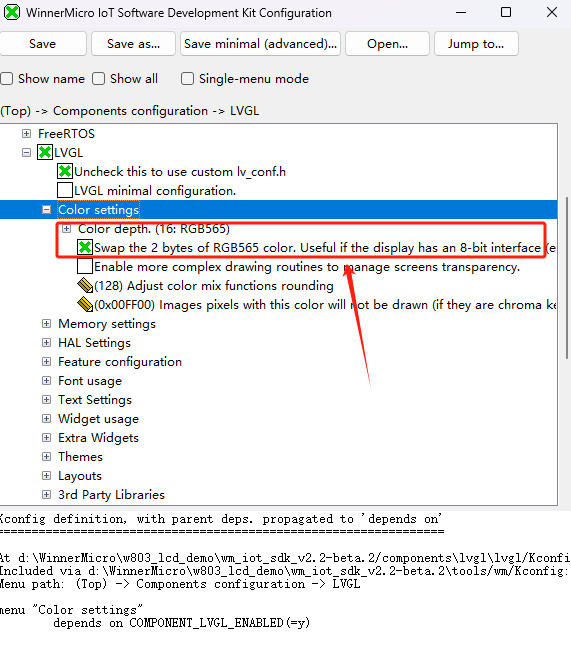
SquareLine工程也要做对应的配置,如下: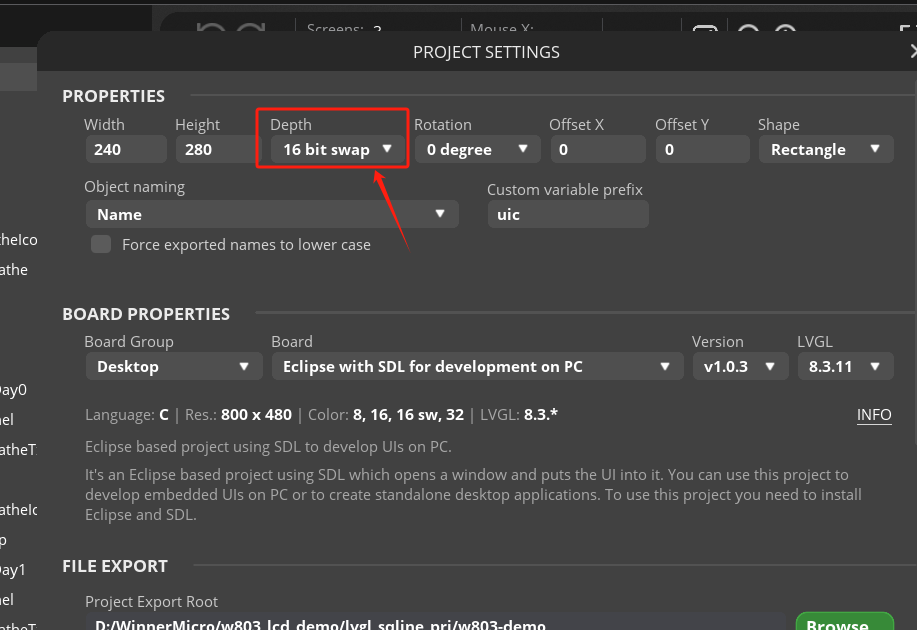
具体代码中做了哪些改动,大家可以拉取代码,和官方的SDK做个对比就知道改动点了
希望本文能够帮助大家在TFT-LCD驱动添加时提供一个参考;
另外希望官方尽快完善更新TFT-LCD驱动添加部分的文档,需加入wmdt.py文档修改。
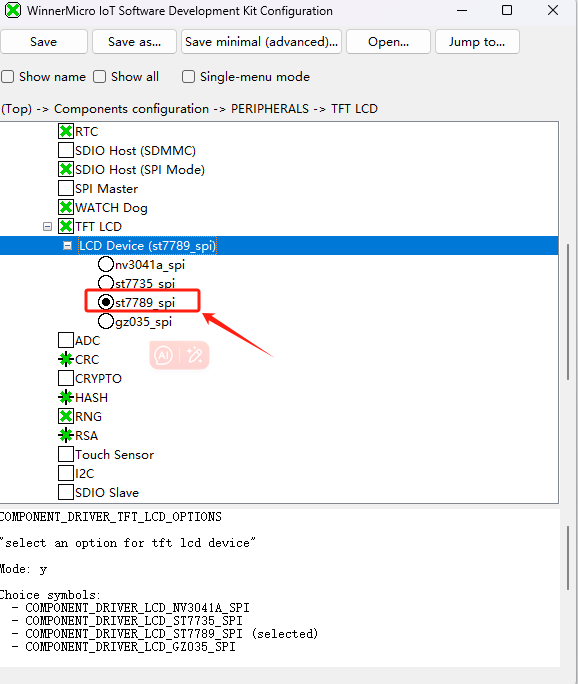
如下是我添加ST7789成功后的menuconfig配置界面,可以正常选择我加入的ST7789驱动: